Managing Primary Navigation: Difference between revisions
mNo edit summary |
|||
| (16 intermediate revisions by 4 users not shown) | |||
| Line 7: | Line 7: | ||
[[Image:Primarynavex.PNG]] | [[Image:Primarynavex.PNG]] | ||
<small>The primary navigation as it appears on http:// | <small>The primary navigation as it appears on http://builderexample.com</small> | ||
| Line 15: | Line 15: | ||
====Accessing the Primary Navigation Editor:==== | ====Accessing the Primary Navigation Editor:==== | ||
You can access the primary navigation editor by clicking on | You can access the primary navigation editor by clicking on "Edit" on it's toolbar. | ||
[[Image:Websitenavigation.PNG]] | [[Image:Websitenavigation-new.PNG]] | ||
You can arrange the order of your pages in the | You can arrange the order of your pages in the Menu Items field by grabbing the Drag (::::) area beside a page and moving it above or below others. This will change the order in which your pages display within the primary navigation section of your site. | ||
| Line 40: | Line 40: | ||
=====Removing Pages from Primary Navigation===== | =====Removing Pages from Primary Navigation===== | ||
To remove a page, simply access the primary navigation settings and click the delete icon ([[Image: | To remove a page, simply access the primary navigation settings and click the delete icon ([[Image:Trashicon.PNG]]) beside the page name. [[Deleting a Page | Deleting a page]] will also remove it from the primary navigation. | ||
=====Adding Dropdown Submenus===== | |||
To create a submenu, drag menu items up or down to sort, and left or right to create dropdown sub-menus. When you're done, you should see a structure such as this: | |||
[[Image:Submenudrag4.png]] | |||
Save changes and take a look at your work - pretty cool, huh? | |||
====Suggestions:==== | ====Suggestions:==== | ||
| Line 49: | Line 57: | ||
If you need more room, or to add secondary links, you can add a [[Navigation Component]] to a [[Content Locations | content location]] of your website. You can add as many of these as are necessary and they can be managed via their respective [[Component Toolbar | settings areas]]. | If you need more room, or to add secondary links, you can add a [[Navigation Component]] to a [[Content Locations | content location]] of your website. You can add as many of these as are necessary and they can be managed via their respective [[Component Toolbar | settings areas]]. | ||
[[Category:Toolbar]] | [[Category:Toolbar]] | ||
[[Category:Beginner Topics]] | [[Category:Beginner Topics]] | ||
Latest revision as of 14:02, 7 April 2016
For information regarding primary navigation as a required html element, please see Primary Navigation.
Your website's primary navigation is the group of links conveniently located at the top of each page in your website to link visitors to any of your other pages, external sites, e-mail addresses or files uploaded through your file manager.

The links within it can be managed to display only those you want to show, and exclude the others. While this area has a bar similar to a Component Toolbar, it cannot be dragged to other sections of your pages.
You can access the primary navigation editor by clicking on "Edit" on it's toolbar.
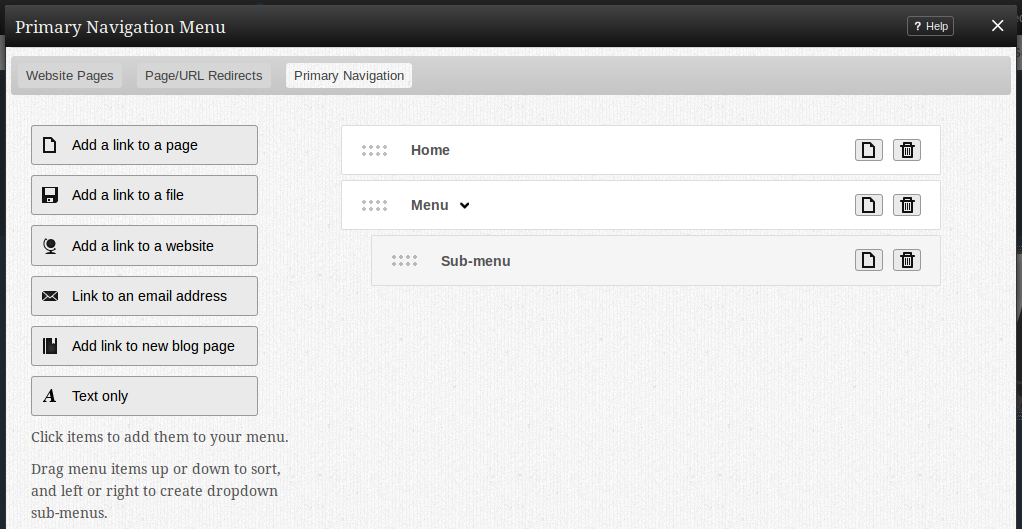
You can arrange the order of your pages in the Menu Items field by grabbing the Drag (::::) area beside a page and moving it above or below others. This will change the order in which your pages display within the primary navigation section of your site.
You can also drag the following items from the column on the left into the menu items section:
- Link to a page in my site will allow you to insert a page into your navigation menu.
- Link to a file on my site will allow you to insert a file into your navigation menu. You can choose a file from your file manager by clicking on the "Browse" button.
- Link to another website will allow you to insert a link to an external address into your navigation menu. You can choose to open a link to another website in a new window using this link type!
- Link to an email will allow you to insert a link to an e-mail address into your navigation menu.
By default, the checkbox to add a page to your primary navigation is selected in the process of creating a new page. Of course, if you choose not to do this, it will not appear in your primary navigation. In this case, you can access it to make changes via the Current Page dropdown on the Toolbar.
To re-add a previously removed or initially un-added page, simply drag "Link to a page in my site" to the appropriate location in the Menu Items area and select the page.
To remove a page, simply access the primary navigation settings and click the delete icon () beside the page name. Deleting a page will also remove it from the primary navigation.
To create a submenu, drag menu items up or down to sort, and left or right to create dropdown sub-menus. When you're done, you should see a structure such as this:
Save changes and take a look at your work - pretty cool, huh?
Suggestions:
In some cases, you may find that you have too many links to be completely displayed in this area, or the number of links causes your primary navigation to appear cluttered. We recommend you add only your main website links to the primary navigation.
If you need more room, or to add secondary links, you can add a Navigation Component to a content location of your website. You can add as many of these as are necessary and they can be managed via their respective settings areas.


