TwitterComponent: Difference between revisions
mNo edit summary |
No edit summary |
||
| Line 15: | Line 15: | ||
After selecting this Component, you will be able to choose exactly where you want to add it! | After selecting this Component, you will be able to choose exactly where you want to add it! | ||
You will see all available [[content locations]] it can be added - on the current page only (content locations in Red) or on every page (content locations in | You will see all available [[content locations]] it can be added - on the current page only (content locations in Gold), on every page (content locations in Red), or on every page under the current page directory (content locations in Blue. For example - if you are editing a page called "About", the blue content locations would allow you to add this component to all pages under the /about/ directory). | ||
Revision as of 08:58, 26 March 2009
The Twitter Component will display the recent Twitter entries you've made.
Where to Find:
This Component can be found in the "Add to Page..." section of the Toolbar.
Adding to Website:
After selecting this Component, you will be able to choose exactly where you want to add it!
You will see all available content locations it can be added - on the current page only (content locations in Gold), on every page (content locations in Red), or on every page under the current page directory (content locations in Blue. For example - if you are editing a page called "About", the blue content locations would allow you to add this component to all pages under the /about/ directory).
Configuring:
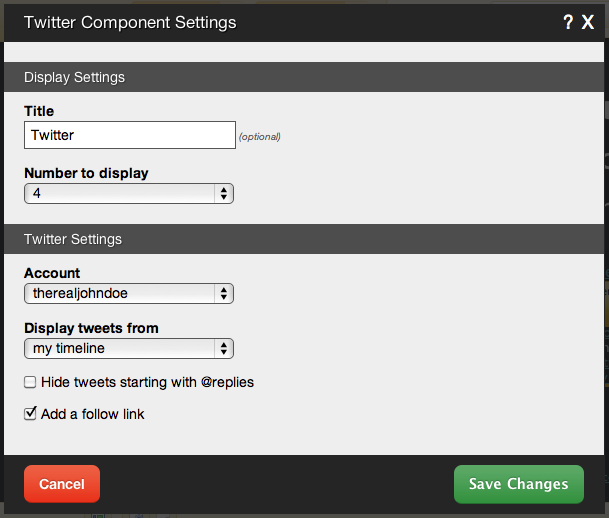
You can optionally set a Title to be displayed above the feed content on your page.
The Number to Display field will let you set the number of feeds that display on your page at a time - between 1 to 15 or all available.
Your Username is what you login to Twitter with. This is required to get your publicly available timeline for your recent Twitter entries.
Editing:
Need to make a change? You can access the settings for this Component again by clicking on the "Settings" button on the Component Toolbar.
Example:
An example of this Component can be viewed on the Social Networking page of http://example.viviti.com

